-
WAVES X-NOISE
-
조회 수: 24509, 2012-05-10 16:30:05(2002-01-03)
-
제목 없음 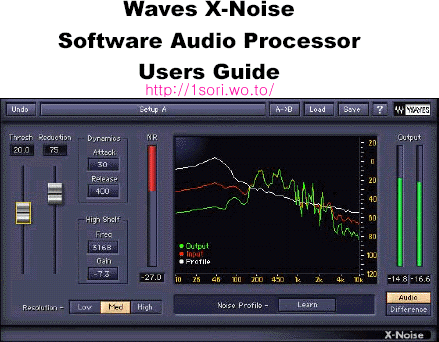
안녕하세요 한소리입니다.
영문 매뉴얼 보고 적은 것인데 틀리거나 잘못된 표현이 있을 수 있습니다.
있다면 글남기기란에 적어 주시면 감사하겠습니다.
X-NOISE는 훌륭한 음질을 유지시키며 신호저하를 최소로 하여 노이즈를 감소시킵니다.
(정말 그런 것 같더군요.)
이 X-NOISE는 Waves Rastoration Bundle의 네가지 이펙터중 하나이며 배우거나 사용하기
쉬운 그림을 제공합니다.
이 X-NOISE는 테입의 히스노이즈나 환풍장치등에서 생기는 백그라운드 노이즈를 제거하는데
이상적입니다.
크거나 짧은 임펄스(Impulse)노이즈나 불규칙적인 것들은 X-CLICK이나 X-CRACKLE을 먼저
사용해야 합니다.
이 X-NOISE는 노이즈를 감소시키기 위해 중요한 두가지 파라메터(Thrashold, Reduction)를
사용합니다. 주어진 인풋신호에 대해 재빨리 이 X-NOISE로 대처하기 위해 이 두가지 파라메터를
먼저 조정 하는데, Dynamics나 High Shelf, Resolution은 더 세부적인 조정을 할 수 있게끔
합니다.
STEP 1 ? CREATE A NOISE PROFILE
원래의 소리(소스)에서 제거하길 원하는 노이즈가 포함된 오디오를 선택하고 X노이즈 분석창
(애널라이저)밑에 있는 Learn 단추를 누르세요.

그 다음 이 X노이즈를 통해 연주시킵니다.(PLAY)
그리고 Learn진행을 멈추고 노이즈 윤곽을 만들기 위해 Learn 단추를 다시 누릅니다.
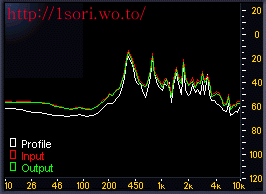
그러면 위의 그림처럼 흰색의 선이 나타내는데 이 선은 분석된 노이즈의 주파수들을
나타내는 것입니다.
이 시점에서 노이즈 윤곽이 포함된 이 X노이즈 상태를 저장합니다.
만약 그렇게 해서 노이즈 부분만을 찾지 못했다면 기본적인 화이트 노이즈 프리셋이나 다른 유용한
공장 초기 프리셋중에 하나를 선택해 다시 시도합니다.
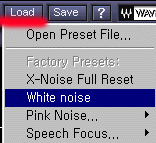
왼쪽의 그림에서 Load를 선택하면 여러 가지 기본값들이
나옵니다. 기본 화이트 노이즈도 있고 핑크노이즈에 관련된
여러 가지 기본 셋들이 있습니다.
STEP 2 ? NOISE REDUCTION
전체의 소리를 플레이 시키면서 원하는 노이즈 리덕션 양만큼 Threshold 와 Reduction을
조정합니다.
노이즈 윤곽선은 소리와 노이즈를 분간하기 위해 사용 되어지는데 Threshold는 이 노이즈 윤곽선의
레벨을 조정합니다.
Threshold를 10dB로 설정했다는 것은 노이즈 레벨이 노이즈 윤곽선 아래에 있다는 것을 의미합니다.
Reduction은 노이즈 리덕션의 양을 정합니다.
Reduction의 값을 증가시키면 노이즈 윤곽선(흰색선) 아래의 노이즈 제거량을 증가시킵니다.
만약 로봇 소리같이 인공적으로 보인다면 Reduction값을 감소시키고 Threshold값을 증가시킵니다.
인공적인 결과물은 어텍, 릴리즈, 레졸루션, 하이셀프값등을 조정해 최소화할 수 있습니다.
STEP 3 ? MONITORING
X노이즈의 최대 특징 가운데 하나는 일반 오디오 출력과 X노이즈에 의해 제거된 신호 가운데
하나를 선택해 모니터할 수 있는 기능입니다.
올바른 조화를 찾을 때 까지 헤드폰이나 시간을 두고 오디오 또 다른 몇몇가지들로 모니터링하기를
추천드립니다.
많은 손상을 받은 오디오파일은 오디오질과 노이즈 리덕션 사이의 타협이 필요합니다.
Controls and Displays

THRESHOLD
노이즈 윤곽선의 레벨을 나타냅니다.
노이즈 윤곽선의 아래의 신호는 지워집니다
Settings = -20 to +50 dB
기본값 = 0 dB
REDUCTION
Threshold 아래에 있는 신호에 적용할 노이즈 리덕션의 양을 정합니다.
이 값이 작다면 노이즈의 작은 양만을 제거하게 되는 것이고 이 값이 크다면 많이 제거하게 됩니다.
Settings = 0?100%
기본값 = 0 %

ATTACK
노이즈가 노이즈리덕션의 피크레벨로 처음 분석되어질 때의 시간을 정하는 것입니다.
(리덕션 조정과 함께 설정)
이것을 작게 잡으면 그 만큼 노이즈를 잡아내는 것에 대해 빨리 반응하게 됩니다.
어텍타임을 설정하는 동안 갑작스런 진행으로부터 팝이나 클릭음을 피하기 위해
노이즈 리덕션은 부드럽게 증가시킵니다.
기본값(0.03 s)은 대부분의 경우에 사용됩니다.
일반적으로 자극적인 소리는 시간을 짧게 잡고 느리게 전개되는 소리는 더 긴 시간을 줍니다.
Settings = 0?1.000 s
기본값 = 0.030 s
RELEASE
이것은 어택타임이 적용된 다음 얼마나 빨리 노이즈 리덕션을 닫을 것인가를 결정하는 것입니다.
어택 값처럼 부드러운 감소는 갑작스런 진행으로부터 팝이나 클릭음을 피할 수
있습니다.
릴리즈 타임은 노이즈 리덕션이 최고치에 도달한 이후나 어택타임이 지난 다음에 작동하게 됩니다.
릴리즈 값을 길게 잡는다면 엠비언스(둘러싸고 있는 환경, 분위기, 잔향)를 더 많이
남겨두게 됩니다.
짧게 둔다면 말하기등의 소리에 매우 유용할 것입니다.
Settings = 0?10.000 s
기본값 = 0.400 s

High Shelf는 X노이즈가 높은 주파수대에서 어떻게 작동할 지를 변경하는 것입니다.
FREQ
노이즈 윤곽선의 높은 주파수대를 변경할 때 사용됩니다.
Settings: 700 Hz ? 20 kHz
기본값 = 4006 Hz
GAIN
게인을 낮추는 것은 cutoff frequency위의 주파수들에 대해 트래숄드를 낮게 합니다.
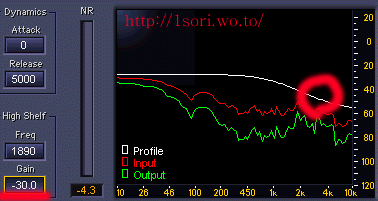
이렇게 되면 높은 주파수대는 노이즈 윤곽선이 낮아져 기본값일 때 보다 높은 음역대의
노이즈를 덜 줄이게 됩니다.
게인을 높이면 cutoff frequency위의 주파수들에 대해 트래숄드를 높게 합니다.
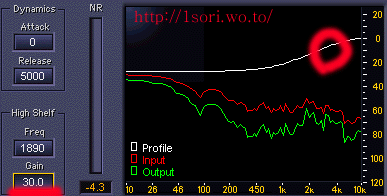
이렇게 되면 높은 주파수대는 노이즈 윤곽선이 높아져 기본값일 때 보다 높은 음역대의
노이즈를 더 줄이게 됩니다.
Settings = -30 to +30 dB
기본값 = 0 dB
RESOLUTION

레졸루션은 X노이즈 알고리즘에 의해 사용되어지는 씨피유 사용을 어떤 방법으로
하는지를 결정합니다.
High는 좋은 오디오 결과를 가져다 주며 오디오 데이타를 진행하거나 분석함에 있어
많은 씨피유 자원을 소모하는데, 만약 낮은 클럭의 씨피유를 사용한다면 Med 나 Low 를
사용하시는 것이 좋습니다.
High 레졸루션은 주파수 범위에서는 최고의 품질을 제공하지만 시간의 범위에선 그렇지
않습니다.
오디오가 빨라진다거나 등의 이상한 증세가 있다면 이 레졸루션 값을 낮춰 주십시요.
Settings = Low, Med, High
기본값 = Med
웨이브스사에선 노이즈 윤곽선과 사운드 소스를 편집할 때 같은 레졸루션 방법으로 할 것을
권장하고 있습니다.
다른 레졸루션은 다른 알고리즘으로 운영이 된다고 합니다.
NOISE PROFILE


노이즈 윤곽선은 자신이 없애고자 하는 노이즈가 있는 대표적인 샘플의 일부부분을 선택함으로써
만들어 집니다.
최고의 결과는 자신이 없애고자 하는 백그라운드 노이즈가 포함된 부분만으로 이루어져 있는 부분만을
선택했을 때에 얻어집니다.
오디오 편집을 시작하기 위해 Learn 단추를 누릅니다.
그러면 단추는 다시 Learn단추를 누를 때 까지 빨간색과 노란색으로 깜박거리게 됩니다.
더 많은 정보를 위해 이 노이즈 윤곽선을 볼 필요가 있습니다.
OUTPUT MONITOR

아웃풋 모니터는 X노이즈에 의해 편집된 오디오와 현재의 셋팅에 의해 제거된 노이즈 둘중에 하나를
들을 수 있게 합니다.
Audio는 기본값으로 편집된(프로세싱된) 결과물이 들리게 되고
Difference는 원래의 소리(소스)에서 제거된 소리를 들을 수 있게 합니다.
DISPLAYS

NR은 NOISE REDUCTION METER입니다.
노이즈 리덕션 미터는 노이즈 제거의 폭을 보여줍니다.
X-NOISE ANALYZER
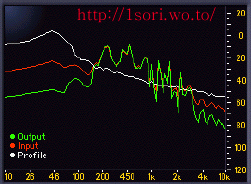
X노이즈 분석창은 이 플러그인의 가장 중요한 부분입니다.
이것은 세가지 색깔의 spectral envelope를 보여줍니다.
? Red ? X노이즈로 편집(프로세싱)되기 이전의 인풋 신호
? White ? 노이즈 윤곽선
? Green ? X노이즈로 편집한 후의 아웃풋 신호
좋은 노이즈 리덕션 편집은 녹색선이 대부분 빨간색 인풋 신호 아래에 있고
최고점(피크)은 빨간색과 녹색선이 겹치는 그림입니다.
WHAT IS A NOISE PROFILE?
A noise profile is a segment of data that represents a normalized portion of the
noise targeted for removal. X-Noise uses this data to analyze the entire audio
input for noise with the same characteristics.
CREATING A NOISE PROFILE
To create an effective noise profile, try to find a section (at least 100 ms)
containing only pure noise in the source recording. These sections are typically
found before the audio begins, after it ends, or during a pause in the speech or
music.
Select and play this segment through X-Noise and click the Learn button (below
the Analyzer). The button changes to Learning and blinks to indicate that X-Noise
is creating the noise profile. Click again to stop the Learning process and return
to normal processing mode. The spectrum of the noise is displayed in the X-Noise
Analyzer as a white line.
At this point, we recommend saving your X-Noise setup, which includes the noise
profile.
If the source material does not have a section containing the pure noise you want
to remove, you cannot create a noise profile and must instead use one of the
factory presets. This method generally compromises noise reduction efficiency
because isolating the noise from the audio is less accurate which leads to more
audible artifacts.
Important Note: The noise profile should be created from the source recording
used as the input to X-Noise. Creating a noise profile from a different source will
not help X-Noise recognize the noise in your source. However, if you cannot find
a noise-only segment in your source but can find one from the same recording
session under the same conditions, you can use it instead and obtain good
results.
SAVING, LOADING, AND SHARING NOISE PROFILES
The WaveSystem includes a Save button that stores the noise profile in the
setup file along with other parameter data. Each X-Noise setup file has two
spaces available for noise profiles, allowing analysis and storage of two
segments of noise which can be easily compared to see which works best.
After creating a noise profile, an asterisk indicates that the setup has been
modified in the Setup A/B name bar. This noise profile can be saved into a new
setup or over the current one. A noise profile can be loaded by itself from any
previously saved setup. This can be useful if other sessions need to be
processed from the same recording conditions.
LATENCY
To properly perform its task, X-Noise must look ahead to into the future. It
manages this incredible feat by delaying the source signal by 5120 samples
(about 116 ms in CD quality material). This is particularly significant when the
noisy track runs along with other tracks. To maintain sync, other tracks should be
delayed by the same amount. There is no way to avoid this in live recording
situations, therefore X-Noise is not recommended when monitoring a live event.
To use X-Noise in a sound file editor, it is important that the editor is able to
compensate for the plug-in’s delay. If this feature is not available in your host,
add at least 5120 samples of silence at the end of the file and trim the start after
the process is done.
STORING AND RECALLING THE NOISE PROFILE
Some audio host applications cannot store the noise profile data with the other
plug-in settings. This means that saving a high level document such as a
session, song, or work that includes X-Noise may not store the noise profile
associated with that audio. We recommend saving setups within the
WaveSystem to insure that the noise profile is saved.
SIDE EFFECTS
| 번호 | 제목 | 닉네임 | 조회 | 등록일 |
|---|---|---|---|---|
| 6 |
Waves Tuner
(1)
| 한소리 | 10479 | 2006-02-07 |
| 5 | 한소리 | 13780 | 2005-12-14 | |
| 4 | 한소리 | 11968 | 2005-07-02 | |
| 3 | 한소리 | 12869 | 2002-01-04 | |
| ⇒ | 한소리 | 24509 | 2002-01-03 | |
| 1 | 한소리 | 12437 | 2001-10-12 |
서비스 링크


